Phoenix Ignited is a proud tech solutions partner of Luxauro.com. View their news and media page here: Luxauro.com
In this tutorial I go through Wazuh’s File Integrity Monitoring (FIM) capabilities. I will explore the FIM dashboards, experiment with modifying some files, and some minor configuration changes. The aim is that by the end of the tutorial you have a basic understanding of how to navigate and utilize the File Integrity Monitoring capabilities of Wazuh. If you don’t have Wazuh installed you can see my tutorial here on installing Wazuh on Ubuntu: https://phoenixignited.tech/installing-wazuh-on-ubuntu/ The official Wazuh FIM docs can be found here: https://documentation.wazuh.com/current/user-manual/capabilities/file-integrity/index.html
Let’s Dive!
In the Wazuh dashboard navigation menu go to -> Endpoint Security -> File Integrity Monitoring.

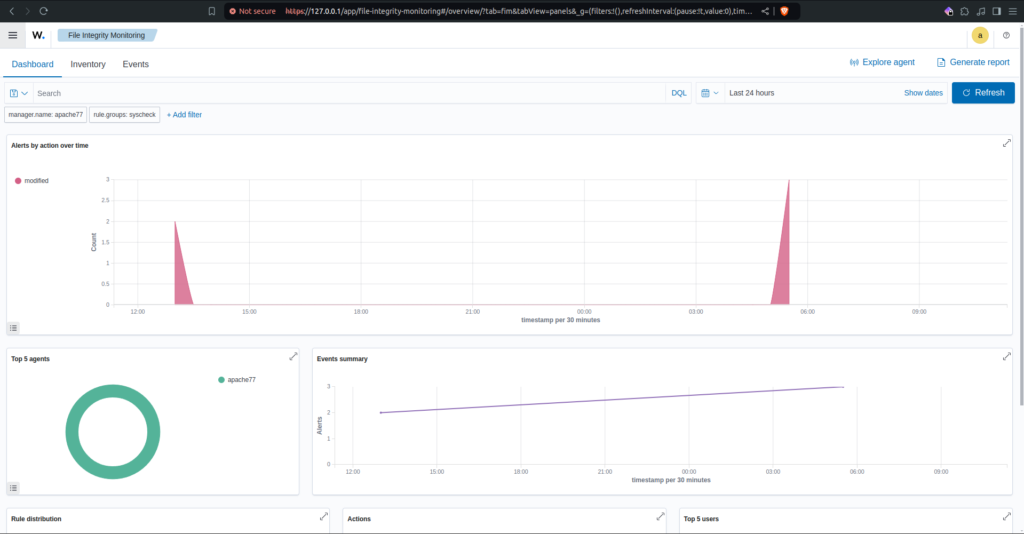
Above you can see the File Integrity Monitoring Dashboard. The top area graph shows how many files were modified, deleted, or created over the specified period of time. The bottom left display shows the top 5 agents effected. In this case the only agent effected is apache77. In the bottom right display you can see the events summary which is more or less just a simplified version of the area graph above. If you scroll down, you will find further graphs and displays.
Now if we navigate to the “Inventory” tab we can view files monitored by Wazuh.
Note: You will not be able to view an inventory for files on the machine on which the Wazuh Manager is installed. Although the Wazuh Manager does record files changes, deletions, and creations on the host machine, it doesn’t provide an inventory of these files to the Wazuh dashboard. You can only view the inventory of monitored files on machines monitored by agents.

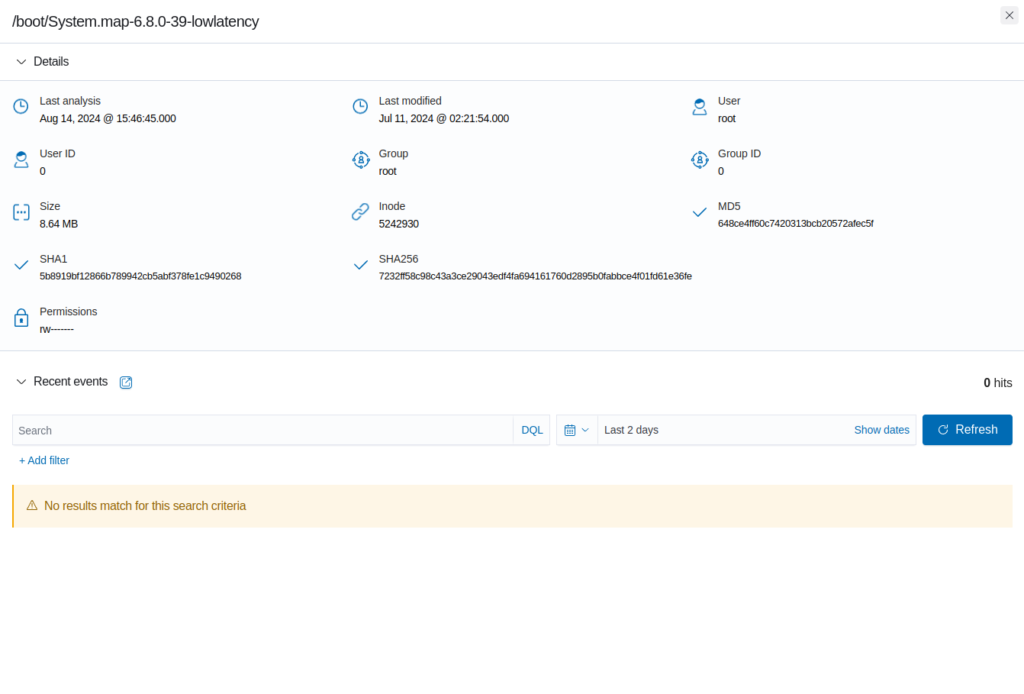
In the “Inventory” tab we can explore files monitored by Wazuh. We can view the path, the date last modified (as recorded by Wazuh), etc. Selecting a file will open an extended view with more information, including md5, sha1, and sha256 checksums of the file as well as file permissions.

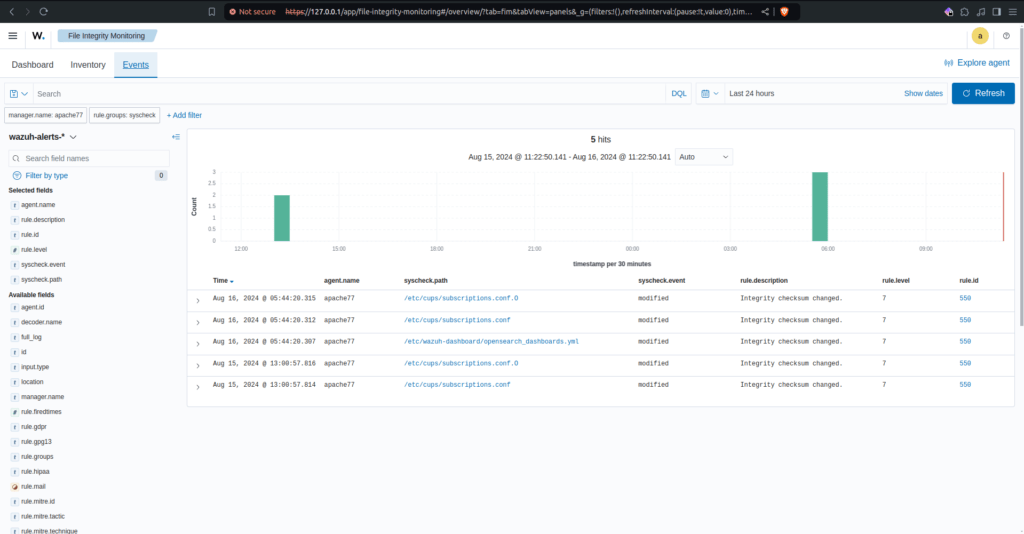
If we navigate to the “Events” tab we can view events affecting file integrity, including file modifications, file creations, and file deletions.

Here we can see the date and time of the event, agent on which it occured (including the Wazuh Manager as it does record file changes etc.), file path, type of event (modified, deleted, created), rule description, and rule id. Above you can view a bar graph of File Integrity events. On the left we can filter results by field etc. For instance we could filter our results to only match the rule id 550.
In this section we will take a look at adding custom configurations to the FIM capabilities of Wazuh. This involves opening the main Wazuh configuration file ossec.conf and tweaking a few settings, specifically we will go through adding a custom directory for Wazuh to monitor and we will decrease the interval time between file integrity checks.
The location of the ossec.conf file depends on your operating system, see below:
Linux: /var/ossec/etc/ossec.conf
Windows: C:\Program Files (x86)\ossec-agent\ossec.conf
macOS: /Library/Ossec/etc/ossec.conf
Below is the portion of the ossec.conf file we want to edit. Notice the <frequency> section and the <directories> section. We will want to change the <frequency> value to 10 (seconds), and in the <directories> section we will add a custom directory for Wazuh to monitor. For example /home/<your_username>/testdir. After running the following experiments you will probably want to set these settings back to the default (especially the frequency setting as setting Wazuh to check the integrity of your files every 10 seconds could be rather resource intensive).
<!-- File integrity monitoring -->
<syscheck>
<disabled>no</disabled>
<!-- Frequency that syscheck is executed default every 12 hours -->
<frequency>43200</frequency>
<scan_on_start>yes</scan_on_start>
<!-- Generate alert when new file detected -->
<alert_new_files>yes</alert_new_files>
<!-- Don't ignore files that change more than 'frequency' times -->
<auto_ignore frequency="10" timeframe="3600">no</auto_ignore>
<!-- Directories to check (perform all possible verifications) -->
<directories>/etc,/usr/bin,/usr/sbin</directories>
<directories>/bin,/sbin,/boot</directories>
After we modify the ossec.conf file, we need to restart the wazuh agent. This can be accomplished via the following command:
Linux: systemctl restart wazuh-agent
Windows: Restart-Service -Name wazuh
macOS: /Library/Ossec/bin/wazuh-control restart
In this next section we will experiment with modifying, deleting, and creating files monitored by Wazuh. This gives us some hands on experience with how Wazuh reports file modifications etc.
Navigate to the custom directory we added to the ossec.conf file in the <directories> section. In this directory add three files. For instance text1.txt, text2.txt, and text3.txt. Now navigate to your Wazuh FIM dashboard. You should see three new file creation events. Now go back and modify file1.txt, and delete file3.txt. Go back to your Wazuh FIM dashboard. You will now see a file modification event and a file deletion event. If you go to the “Events” tab you will see exactly which files were created, modified, and deleted.

That’s a wrap! You should now have a pretty good idea of how the Wazuh FIM dashboard works and a basic knowledge on customizing the Wazuh FIM settings in the ossec.conf file.
Walter Miely is a tech entrepreneur and CEO of Phoenix Ignited Tech You can find him on Linkedin. This material is licensed under the CC BY 4.0 License LEGAL DISCLAIMER: The content provided here is provided AS IS, and part of, or the entirety of this content may be incorrect. Please read the entireLegal Disclaimer here.
+ Ave Maria +