Phoenix Ignited is a proud tech solutions partner of Luxauro.com. View their news and media page here: Luxauro.com
In this tutorial I go through installing Wazuh, an opensource SIEM on Ubuntu. It covers installing both the Wazuh Manager and the Wazuh Agent. The official Wazuh quickstart docs can be found here: https://documentation.wazuh.com/current/quickstart.html so if you are running an OS other than Ubuntu check those out! You can also find the hardware requirements along with tons of other info there!
The following command will download and run the Wazuh installation assistant. I got some errors running the command as is, however adding -i ignored the errors and it proceeded OK.
Note: Be sure you have no other apps running on Port 443 before installing Wazuh, otherwise Wazuh will be unable to install.
curl -sO https://packages.wazuh.com/4.8/wazuh-install.sh && sudo bash ./wazuh-install.sh -a
Depending on your system specs the installation may take a few to several minutes, and can be rather taxing on the system resources. Once it is done installing you will see the admin access credentials:
username: admin
password: <randomly generated on installation>
Note: In the future you can access the password via running:
# Run this to view the Wazuh dashbaord and API credentials
sudo tar -O -xvf wazuh-install-files.tar wazuh-install-files/wazuh-passwords.txt
UPDATED August 24, 2024: Now that we have the Wazuh manager successfully installed on our machine we need to access the dashboard. You have to access the wazuh dashboard via https://<your-wazuh-dashboard-ip> (http doesn’t work). You will get warnings about the ssl certificate. You can just ignore them this time.
Note: If you installed the Wazuh Manager and Dashboard on your local machine, you should be able to access the dashboard via: https://127.0.0.1
You should see:

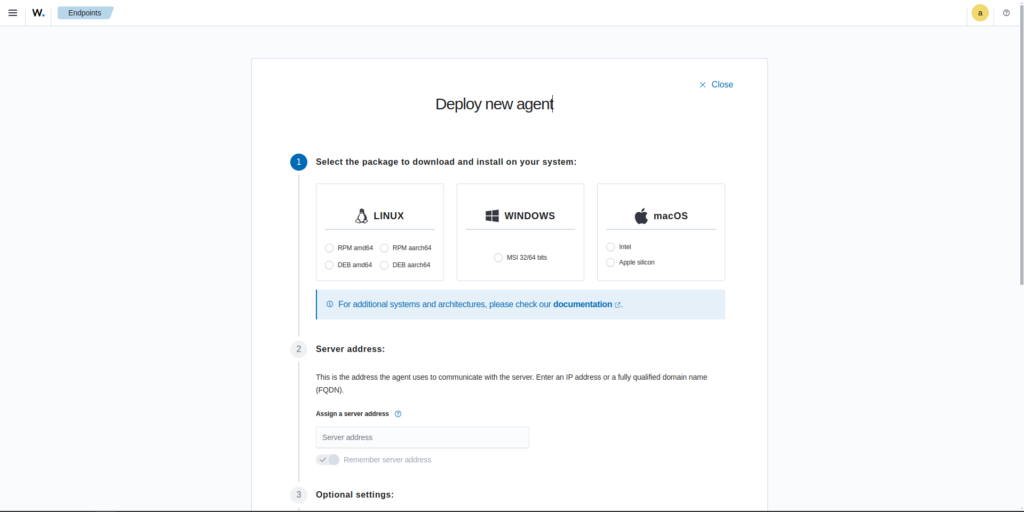
To install the Wazuh agent go to the Wazuh dashboard, if you have not deployed an agent yet there should be a message that directs you to deploy your first agent. You will be directed to the agent onboarding wizard:

In step 1 you will be directed to select your operating system type. Next you will be directed to enter the server IP address, this is the ip address of the machine that you are running the Wazuh manager on. In step three you will be directed to assign the agent a name.

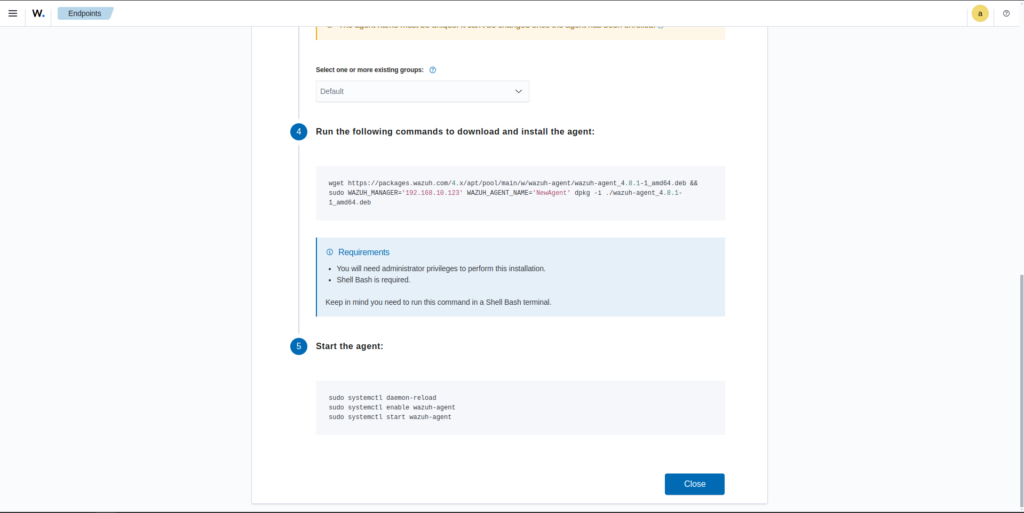
In step 4 we download and install the agent. The wizard generates the code for you based off of your input to the preceding steps. Just copy and paste the code into your console / terminal. In step 5 we start up the agent. The wizard displays the code for you to copy and paste just as with the installation script.

Now back in the Wazuh dashboard close out of the new agent wizard and go to the dashboard home. You should be able to see your new agent in the top left corner of the screen. You can also view and manage agents by going to the “Endpoint Security” section in the Wazuh navigation menu.
That’s a wrap! You have now installed the Wazuh manager and the Wazuh agent, you can now monitor all connected agents via the Wazuh dashboard, view threats, and perform other everyday security operations, to ensure your organization is protected against cyber threats in the 21st century.
Walter Miely is a tech entrepreneur and CEO of Phoenix Ignited Tech You can find him on Linkedin. This material is licensed under the CC BY 4.0 License LEGAL DISCLAIMER: The content provided here is provided AS IS, and part of, or the entirety of this content may be incorrect. Please read the entireLegal Disclaimer here.
+ Ave Maria +